Showing posts with label food. Show all posts

Thursday, February 2, 2012

The Way To The Heart

it was my brother's seventeenth birthday yesterday. he's a very difficult person to organise presents for, and so at the start of the week i was still digging around for a possible gift. then eventually i had a glorious idea: BAKING! my brother loves food (i mean, who doesn't, right?) and i love baking. it seemed like a match made in heaven.
i ended up making him three things: CUPCAKES, ALMOND BISCUITS and A BIRTHDAY CAKE. the cupcake recipe is taken pretty much entirely from Anthony Telford's Basic Cookbook; as is the birthday cake. and the almond biscuit recipe came from my grandmother. enjoy :-)


cupcakes
i always believed that cupcakes were little muffins. The recipe says it makes 24, but when I baked these I got about 60 :-o I ended up freezing some.

mini cupcake tray (If you want 60, that is. Otherwise, I'm sure using a regular muffin tray will be fine)patty pan cases
300g self raising flour
200g unsalted butter, softened
200g caster sugar
3 eggs
1 teaspoon vanilla essence
2 tablespoons milk
chocolate buttons (I added these)

***
preheat the oven to 180C (fan forced: 160C). line the cupcake moulds with the patty pan cases, or simply place the cases on a baking tray.

sift the flour into a mixing bowl and add all other ingredients. use an electric mixer (you can just use a spoon; i did, and they turned out fine) to slowly incorporate the ingredients. beat for five minutes until light and fluffy. (it is VERY, VERY important NOT TO UNDER- OR OVERBEAT. if the mixture is underbeaten, it will be crumbly in texture, and if it is overbeaten the cupcakes will rise too much, making icing difficult).

spoon the mixture into the paper cases until three-quarters full. place in the oven and bake for 20 minutes or until golden on top and the cakes spring back when lightly pressed.
remove from the oven and cool on a wire rack. when cold, top with icing (if desired).


icing
i didn't use a recipe for this, and made quite a large quantity of icing (though i didn't ice all the cupcakes, only the 17 i gave to my brother and a few more for school lunches). so i ended up using the rest for the cake.

250g icing sugar
50g butter, softened (not melted. the butter should be soft enough to stir with ease)
dash of milk
cachous (those little coloured balls you find in the cooking aisle of supermarkets)

***

sift the icing sugar (very important! you do NOT want lumps in your icing)

add the butter and milk and combine until you have formed a smooth paste. you may need to add more milk along the way, though you don't want it to be overly runny.
dip the cupcakes in the icing and sprinkle with cachous or any other decoration you desire.

NOTE: if making the cupcakes a day ahead, you can ice them the night before and keep them in a cool place. the book says to ice the cupcakes just before serving, but as i planned to give my brother the cupcakes in the morning i chose to ice them at night and stored them in a cupboard. they turned out fine.


almond biscuits
i wasn't intending to make these for my brother, but while hunting through my pantry i found some leftover almond meal and decided to use it. i didn't have enough almond meal to make a full batch and the biscuits turned out a bit small, but they were very delicious :-)
200g almond meal
200g sugar
2 eggwhites, lightly beaten.
slivered almonds, to decorate (optional)
***
preheat the oven to 180C (fan forced: 160C, or, like i did, you could just make them at the same time you make the cupcakes!) line a baking tray with baking paper.

mix the almonds, sugar and eggs together.
roll the mixture into balls and place on the tray. top each biscuit with a slivered almond (if using)

bake for about 20 minutes or until golden. leave on tray to cool slightly before transferring to wire rack.

hummingbird cake

i was looking for recipes that didn't have butter in them and came across this one. this cake is so deliciously moist, and the combination of banana and pineapple is definitely a great one. the recipe says to make two cakes and sandwich them together with a filling, but as my ingredient stockpile was limited i decided to only make one cake. it turned out really well, i'm happy to say. i'll include the original ingredient list as well as the measurements i used in italics. this cake is a beautiful one to make and definitely worth a go on a rainy day. plus, i FINALLY got to use the beautiful cake stand i got for my birthday!

2x springform cake pans, if wanting to make two cakes
baking paper

375g plain flour, sifted (200g)
1 teaspoon bicarbonate of soda
450g soft brown sugar (200g)
1 teaspoon ground cinammon (really, don't measure this. i love cinammon so much and am very liberal with my helpings. just chuck as much as you want in)
250mL canola or safflower oil (roughly 200mL. i used vegetable oil, and it tasted fine)
3 large eggs, at room temperature, lightly beaten (2)
1 teaspoon vanilla extract (again, don't bother measuring. be as liberal or as stingy with it as you want)\230g canned crushed pineapple (i had 400g of pineapple chunks. i drained the can and reserved the juice, and added all the chunks to the mix)
4 large ripe  bananas, mashed or chopped (2, chopped)
leftover icing, see above recipe (optional. Anthony Telford uses passionfruit frosting - if you want the recipe, i can include it.)
walnuts, for topping (optional)
cinnamon, for dusting (optional)

***
preheat the oven to 170C (fan forced: 150C). grease two round cake tins, dust with flour and line the bases with baking paper. (as i was only making one cake, i used one tin, greased it with vegetable oil and lined the bottom)

combine the flour, bicarbonate of soda, sugar and cinammon in a large bowl.

add the oil, eggs and vanilla and mix with a spoon until well combined. do NOT beat. (the eggs really must be at room temperature, as if they are too cold they will split the mixture. beating the mixture will overwork the gluten and make the cake tough; this cake should be dense and moist, rather than light and fluffy)

stir in the pineapple and banana and pour into the prepared tin(s).

bake for 45-50 minutes or until a skewer inserted into the centre comes out clean. (the cooking time really does depend on your oven. my cake was done in about 30 minutes).

cool in the cake tin(s) for 10 minutes before turning out on a wire rack.
if making two cakes (which you will need the passionfruit frosting for, as the icing i made is not enough): when cold, ice one cake with frosting, top with the second cake and ice the other cake with the remaining frosting, decorate, if desired, with extra crushed pineapple or simply dust with ground cinammon.

my version: when cold, ice the cake with above icing. top with walnuts and dust with ground cinammon.
cupcakes and almond biscuits
and the cake is complete!

the cake, un-iced


a couple of cupcakes, lazing about

Wednesday, November 16, 2011


this dip is incredible! it's a nigella lawson recipe, and i just couldn't resist making it...though i ended up doing it a little differently to hers.
ever since my dad went into anaphylactic shock a couple of years ago, we haven't eaten chickpeas. and that means no hommus :( so i was so happy to discover this pseudo-hommus! same texture, no allergy - it's really win-win.

this is how i did it. it's not the true recipe, but seeing as we don't eat garlic during the week (we love it, but my dad goes to a lot of meetings and doesn't like the halitosis it gives you) and seeing as we don't have a food processor, i couldn't make it exactly the same. so i improvised a little, and reckon it turned out pretty splendidly!

***

red kidney bean dip

olive oil (not extra virgin)
1 onion, finely chopped
1 can red kidney beans, drained
copious amount of tomato paste
ground cumin
ground coriander
ground cinammon
lime juice (from about 1 lime)
pepper and salt
basil and coriander leaves, to garnish
flatbread, to serve

***

heat the oil and add the onion, cooking until browned. if you were to use garlic, you would add it here in crushed form (about 3 cloves).

add the red kidney beans and tomato paste. i love tomato paste and so am quite liberal with it (perhaps too much so) but just add as much as you like, i think.

add the cumin, coriander, cinammon and lime juice. i'm also liberal with my spice usage, but again, use as much as you like. the lime juice was taken from a bottle, so i just added a little, tasted, and then added more if i didn't think it was flavoured well enough.

remove from the heat and cool slightly. the dip should look deliciously like chilli con carne. it's now meant to be added to a food processor and turned into a hommus-esque puree, but as i lack such equipment i had to improvise. it may be overwhelmingly unorthodox of me, but i ended up using a regular old potato masher. it didn't really do a great job of pureeing the dip, but it broke it down into a worthy dippish pulp.

once your dip is sufficiently pulverised, put it in a bowl. cover it in cling wrap and place in the fridge until about 30 minutes before serving. once you're ready, let the dip come to room temperature and add some pepper and salt to taste.

nigella used grated lime zest to garnish, but as i didn't have lime zest i used some herbs from my flourishing pride and joy of a herb garden. coriander is one of my favourite herbs, and as it was already used in the dip i didn't see a problem with adding a bit of the fresh variety. and i absolutely love the peppery scent and taste of basil, so i couldn't resist adding some.

serve with pitta, flatbread or any bread really. or you could even just eat it on its own, i reckon it's nice enough!

Sunday, August 7, 2011

le lapin!

today i made a rabbit casserole/stew with my dad. we improvised the whole thing and it worked out really, really well.
the maltese love their rabbit, so we're not unfamiliar with it. rabbit's great in that it's very lean and bonds with many flavours, but it can become tough quite quickly.
here's a basic recipe, from memory: rabbit casserole with gnocchi.

oil, for frying
onion, diced
tomato paste (as always, be liberal!)
2 wild rabbit (we bought them from coles, they were nice and clean)
fennel (not too much)
2 cans tomatoes (diced, preferably)
marsala (again, not too much)
peas
pepper
gnocchi (2 packets)

1. preheat the oven to 180 C (fan forced, so 200 C for a regular oven). heat the oil in a frypan over low-medium heat. add the onion and tomato paste and cook.
2. cut the rabbits into pieces, using a sharp knife. the bones are brittle and may break easily around the legs. add to the pan and bring to high heat (but keep an eye on it because you don't want the rabbit to get too tough). cook until lightly browned.
3. reduce to lower heat. add fennel, tomatoes, marsala and peas. season with pepper. place in a casserole dish and cook for around 1.5 hours, checking the meat occasionally.
4. bring a pot of salted water to the boil. add gnocchi and drain when the water reboils. serve with olives, bread and grated cheese if you wish.

serves 6-8.

Friday, June 10, 2011

this week has been so wonderful. i really can't explain it...i don't think i've felt this great about things in quite a while. life is so beautiful, the world so so beautiful. though it is insanely cold here - i like cold weather, but right now my fingers feel like icicles :/
i'm really looking forward to the future and the opportunities it holds. last week my dad told me that the couple who works in the office next to his lost their 18 year-old son to suicide at the end of may. even though i didn't know the guy personally, it made me sad to know that he'd felt like there was no other option but to end his life. there is always another option.
this week has been very quiet. i haven't done much except study and cook. cooking is very, very therapeutic...but i confess i'm a little on the messy side :/
next week should be fun, i have one exam on tuesday and then the rest of the week to study. what an interesting life i lead! :P
i've started smiling more. i've realised it's such a nice feeling to smile...plus seeing as i can't frown or raise my eyebrows it's pretty much the only 'expression' i have :) sort of nice when i think about it. i hope i continue to smile more until i become a cheshire cat :P happiness is a great feeling. may you be happy always :)
peace.

Wednesday, December 8, 2010

Trifle!


Mum often makes trifle at Christmastime, and a couple of years ago I learnt how to do it. It's quite simple and very fun to make!
I finished this trifle yesterday and am really happy with how it turned out (can't wait to eat it either!) Following is the "recipe" I use for trifle - note that I don't actually measure anything...

roughly 7 sponge/ladyfinger biscuits (savoiardi)
2 packets jelly crystals (I like using the Port Wine flavour)
liquor, such as Cointreau (optional)
assorted fruits (strawberries, mango, pineapple...I used approx. half a tin of fruit salad)
1 punnet fresh blueberries
vanilla custard
whipped cream
grated chocolate

1. Arrange the biscuits around the base and sides of a glass bowl.
2. Prepare one pack of jelly crystals according to packet directions and add to the biscuits. Add liquor if using. Leave in the fridge to set. Make the remaining jelly and leave to set. Once set, add to the biscuits.
4. Add the fruit and some of the blueberries (reserving approx. half a dozen). Pour enough custard over the fruit to fill the bowl.
5. Use a piping bag or pen to decorate the trifle with the whipped cream. Add extra blueberries and grated chocolate.

Trifle will keep for several days in the fridge.


Friday, July 30, 2010

Imqaret.


This is another traditional Maltese dish which I love to make. My nanna introduced me to imqaret and I absolutely loved them - and was desperate to learn how to make them for myself!
Imqaret (singular mqarut) are date-filled pastries, scented with orange flower water and served hot or warm. They are traditionally deep-fried but it's much easier to bake them. When we were in Malta we didn't get to try these but when I go back I will search for the real thing.
They are very simple to make and very, very addictive. Even if you aren't great at baking, imqaret are very hard to get wrong.
Below is the way I make imqaret:

500g pitted dates
Water
1tbsp orange blossom (flower) water
6 sheets puff pastry


1. Preheat the oven. I have a fan forced oven and usually preheat to about 180C. If you have a conventional oven, 200C should be adequate. Remove the baking trays from the oven before preheating.

2. Set aside the sheets of pastry to thaw. Traditional imqaret use handmade pastry, but puff pastry is so easy and works really well.

3. Place the dates in a medium sized saucepan, cover with water and add the orange blossom water. Using 500g of dates should be enough, but there is no reason why you can't use more.


*A note on orange blossom (flower) water. This is basically made from distilled bitter-orange blossoms and is used traditionally in Middle-Eastern cooking. It has a great smell and taste and is really nice in coffee. You can only really get orange blossom water from a deli or specialised stores.

4. Heat the mixture over medium heat, stirring frequently. You will notice the dates breaking up and the water going cloudy. As the mixture thickens the water will turn brown and you should end up with a paste. Don't worry if you are still left with whole dates in the mixture, they taste great in the finished product.


5. Cut a thawed sheet of pastry in half, and spread one edge of each half thinly and evenly with the mixture. Fold both long edges of the sheet together and press the sides with a fork. Repeat with remaining sheets. The trick to imqaret is making them as thin as possible. If they seem to be too thick, press them down with your hands once folded.
Note: Always place the puff pastry on a cool baking tray, if you lay the sheets on a tray which has just come out of the oven the pastry will start to cook and will be difficult to manage.

6. Bake for about 15-20 minutes or until evenly golden, then place on a wire rack to cool slightly.

7. Cut each length into about five rectangles while still warm.


Imqaret are best eaten warm, but can also be enjoyed cold. They are a great snack and keep in the cupboard for about a week (mine never last that long!) Great with coffee, tea or on their own.
If you have leftover date mixture, refrigerate it for another batch. Dad tried it on his cereal and said it was really good, so I guess you could do that too.

Enjoy!


Rachel eating her tenth mqarut.

Friday, July 23, 2010

Imqarrun Il-Forn.


A.k.a. baked macaroni.

So I'm really getting into cooking! This is something I haven't made for a couple of weeks but is seriously one of my favourite things to cook and eat.
This is a traditionally Maltese dish. My grandmother (who is Maltese)makes this all the time, and the recipe found its way to my mother (who isn't Maltese) and then to me. I've made it so many times I don't need a recipe anymore. The following is the way that I make macaroni.

Ingredients:

Olive oil
1 onion
Garlic (optional)
Tomato paste
Grated zucchini, carrot (optional)
1 kg mince (I think I normally use lamb)
1 bottle of tomatoes (tinned tomatoes work fine also)
Peas (these are essentially optional, but they're great)
500g penne
5-8 eggs
Grated cheese


Method:

1. Preheat the oven and make sure you have a medium sized baking dish. I have a fan forced oven so I usually heat it to 200C, if you don't have a fan forced oven I'd say set it to about 220C. I don't usually find it necessary to grease the dish, but it depends on what sort of dishes you have.

2. Heat the oil, add the onion, garlic (if using), tomato paste, vegetables and peas. (if using). A staple food of the Maltese diet is tomato paste. You have to embrace the paste. Always remember you can never use too much of it. I always add the grated vegies but my grandmother doesn't. It doesn't make all that much difference. My dad loves peas and I always add them - I find they really improve the dish.

3. In a separate pot, cook the mince. Apparently you're meant to separate meat and vegetables when you're cooking, it's some hygiene thing...hahaha.

4. Once the mince is browned, add it to the onion mixture and heat together, then add the tomatoes. I have started using these bottled tomatoes called Italian Polpa. They're really good but the bottles are a pain to open. If you have muscles then they shouldn't be a problem.

5. In a separate pot, boil some water for the pasta and cook pasta as usual. You will use a lot of pots here, but it is so fun to make. I always add a little bit of oil to the water, just to give it a bit of extra flavour. You can cook the pasta at the same time as you're doing the mince, or afterwards, it doesn't matter all too much.

6. Once cooked, drain pasta and run under cold water to cool. It is important that you let both the mince and the pasta cool, otherwise when you combine them in the dish with the egg, the egg will cook.

7. Combine pasta and mince in dish, and then add the eggs. Be sure to combine them really well. Regarding the number of eggs, add as many as you feel is needed. I normally add about six, it just depends on the size of the dish.

8. Cover the top evenly with grated cheese and cook in the oven for around 30-45 minutes. I normally use tasty or cheddar cheeses. After half an hour, I usually check the macaroni and just see how well done it is.

This is a really great meal which can be enjoyed both warm or cold. I find it so fun to make (and eat) because there's such a process (as well as tradition) involved. My dad grew up on macaroni and so have I. It's certainly a meal I look forward to and one which I will definitely pass on. If you decide to make macaroni, I am sure you will enjoy it. And don't forget the tomato paste.


Photos 'borrowed' from http://www.spicyicecream.com.au/2008/06/expert-borrowers.html --> a fantastic blog which I really recommend.

Tuesday, July 20, 2010

It's All Greek To Me.

Due to the fact that I hadn't cooked for an ultra-long time and really felt like messing up the kitchen, last weekend I made this:


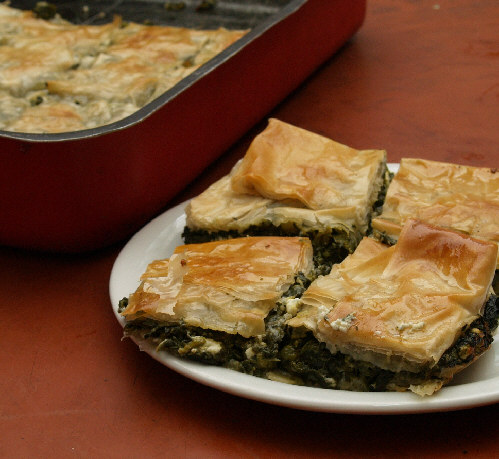
It's called spanakopita (σπανακόπιτα) and it happens to be a Greek pastry dish not unlike burek. I was introduced to burek by some Greek friends, and fell in love with it but never actually got round to trying my hand at it. Then a couple of months ago we bought spanakopita and tried it...and I started up a new love affair! Luckily I had a recipe for it in my Anthony Telford cookbook I blogged about a couple of months ago, so I gave it a shot!

Here is the recipe:

1 bunch spinach
500g Australian feta, crumbled
500g fresh firm ricotta
3 eggs, lightly beaten
1 tablespoon chopped flat-leaf parsley
1 tablespoon mint or dill (optional)
1 teaspoon salt
8 filo pastry sheets
3 tablespoons olive oil

1) Preheat the oven to 180C. Prepare a baking dish by lightly greasing with oil.

2)Wash the spinach thoroughly and place in a pot of boiling water. Cook for 20 seconds or until wilted. Drain and run under cold water to refresh and stop the cooking. When cool, squeeze the excess water from the spinach. You will have approximately 2 cups cooked spinach.

I had silverbeet, which was tough but alright to use. The book says that more spinach can be used if wanted. I broke the leaves away from the stem (which you don't use because it is tough as anything) and then shredded them using my hands. They wilt pretty quickly.

3)Place the spinach in a bowl, add the feta, ricotta, eggs, parsley, mint or dill (if using) and salt, and mix thoroughly. If you make this, be sure to CRUMBLE the feta into very small pieces. You don't want lumps in there. I also found I didn't have to add the salt because the feta made it salty enough. Be sure to mix it really well. Anthony Telford suggests Australian feta because he says it is 'less salty than European feta, therefore allowing the cook to control the saltiness of the dish'.

4)Place four sheets of filo in the prepared baking dish and brush each layer with oil. This forms the bottom layer. Working with the pastry was the hardest part for me. I had never used filo pastry before and was very clumsy! It is crazily thin and breaks easily, plus it dries out super fast. To stop it drying out I covered the sheets I wasn't using with a damp tea towel...which worked. Make sure you oil the sheets well and cover the base and sides of the dish with the pastry. The book also suggests using puff pastry...which I think I may try next time! If using puff pastry, you only need one sheet for the top and one for the bottom.

5)Spread the spinach mixture evenly over the filo. Repeat the filo layers for the top, brushing each sheet with oil. If there is excess filo, just fold it into the side of the dish.

6)Bake in the oven for 25 minutes or until golden and crispy on top. I have a fan-forced oven so I set the timer to 20 minutes, which was adequate.
My spanakopita didn't look like the one above but it sure was fun to make, and it went in a flash! It is traditionally served as finger food, so wait until it cools and cut into individual pieces. If you want to eat it all on your own, then don't worry about the cutting.
This recipe serves 6 and the finished product tastes good (if I do say so myself). Definitely one I'll be making again.

Sunday, May 23, 2010

Lemon Meringue...Die.


So this is what a lemon meringue pie should look like.

Mine looked nothing like this!

We have a lemon tree at home, and it went into production overload and made like fifty lemons. I've always wanted to make a lemon meringue pie and finally after persuading Mum I had the go-ahead.

The pastry went fine, apart from the fact that I had a lapse in concentration and forgot it was in the oven, so it was brown instead of golden.
No matter, no matter, I told myself, progressing onto the lemon custard.

The custard turned out ok, it was really easy to do and I was quite proud of it. The real problem, however, came with the meringue.

I enlisted the help of my sister, who has sufficiently more meringue-constructing experience than myself. She was whisking the eggs and I was finishing the custard, and then we poured the meringue on top and put it in the oven.
Then five minutes later she asks me 'Did you put sugar in the meringue?'
And I, thinking she was joking, replied 'No. Did you?'
To which she said 'No'.

So when I took my pie out of the oven, it had a mound of cooked eggwhite sitting on top. Disappointing, but fun, and I sure am going to make another one of these again.
It took up most of my day but boy, was it worth it!